Part 4 - AWS Lambda Development Environment with CI/CD
- Dennis Chacko

- Nov 29, 2020
- 5 min read
Updated: Apr 10, 2021
Overview
As part of our four part series on setting up an AWS Lambda Development environment, we
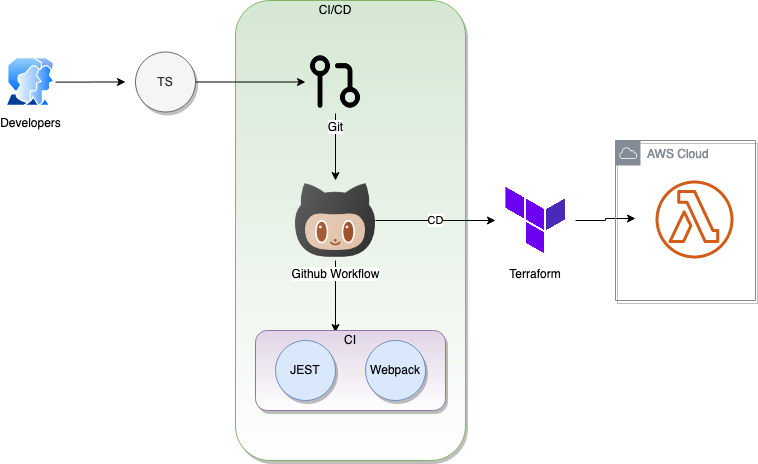
We'll now use Terraform with GitHub Actions workflow to create a Continuous Deployment (CD) pipeline and deploy our code to the AWS Cloud. The workflow we are implementing is shown below.
As always, all code is available at GitHub
Terraform
As per Hashicorp, Terraform is "the infrastructure as code tool for building, changing, and managing infrastructure in a safe, repeatable way". Hashicorp provides a good introduction to Terraform here
But before we get started, we'll need to install the Terraform CLI. Instructions for installing the CLI for each operating system is available here.
The main.tf file
After installing the Terraform CLI, we can now start configuring Terraform to deploy our lambda function to AWS. The main.tf file is the main entry point for Terraform. Lets create this file under the root folder and add the below contents
We can now initialize Terraform by running the below command
terraform init
After a successful initialization, run the below command to correct any format related errors in the main.tf file
terraform fmt
We can now create lambda function in AWS by running the below command:
terraform apply
Terraform should now create the relevant resources in AWS as shown in the output below
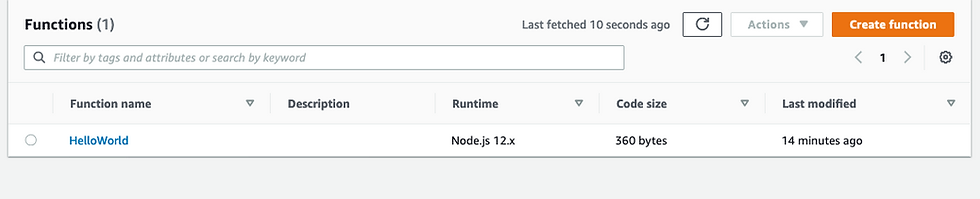
Logging into AWS, we should now see the HelloWorld function successfully created

To clean-up resources created by Terraform, run the below command:
terraform destroy
This command should delete all resources created in AWS by the terraform apply command as shown below
Our Terraform setup is now working correctly in our local development environment. As you can see below, during its execution, Terraform created two additional files
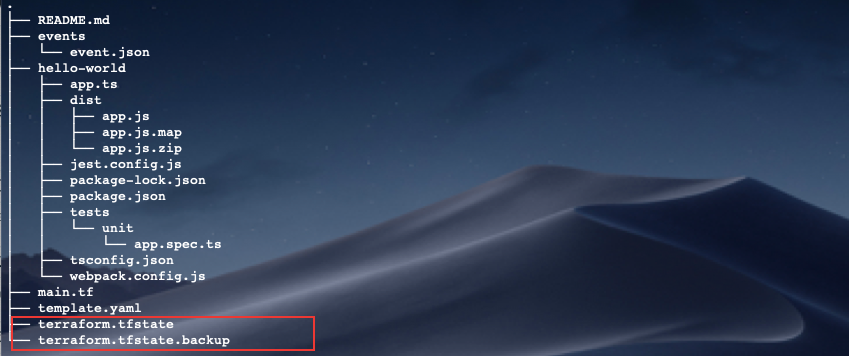
The terraform.tfstate.* files are used to store Terraform state. However, if we run Terraform in GitHub, these files would get deleted after the workflow completes. We need to have persistent storage for these files so that Terraform can access them subsequent executions.
Terraform Cloud
Terraform does provide a free cloud account where these files can be stored and accessed in a secure manner
You can sign-up for a free Terraform Cloud account here. After signing up, please create an organization in your Terraform Cloud account as shown below:

Next, create a workspace inside the new organization as shown below. Choose the CLI-driven workfow type

This is the workspace that GitHub Actions will be using to trigger our Terraform deployments remotely
Add the below three variables to the workspace so that Terraform, running remotely in Terraform Cloud, can connect to AWS
AWS_ACCESS_KEY_ID
AWS_SECRET_ACCESS_KEY
AWS_DEFAULT_REGION

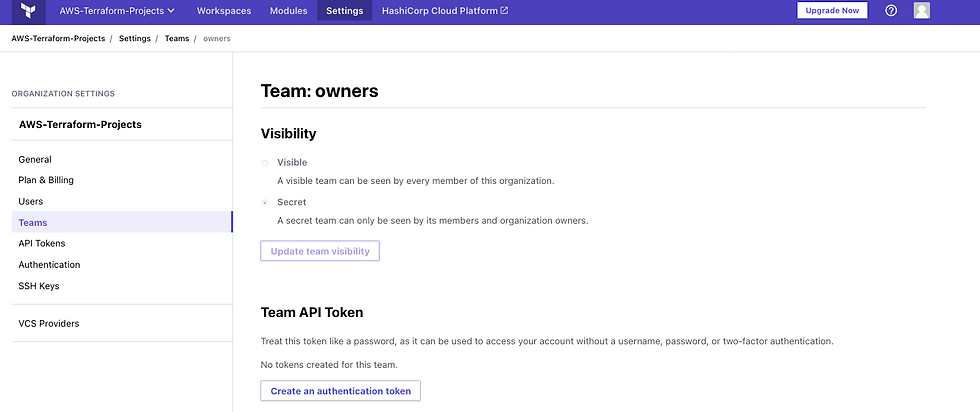
Finally, make a Team API token to grant GitHub access to trigger deployments within your Terraform Cloud workspace
Navigate to your GitHub repo and create a GitHub Secret named TF_API_TOKEN and add the Team API token to it. This should give allow GitHub Actions to securely trigger deployments from within your Terraform Cloud workspace
We now have 3 properties that we need to add to Terraform and GitHub Actions configuration files
The Terraform Cloud Organization name
The Terraform Cloud Workspace name
The TF_API_TOKEN GitHub Secret
Final Configuration
We now have to create a new file called backend.hcl to store the organization name and workspace name.
Most of the properties used by Terraform is stored in a file called variables.tf. However, due to the way Terraform gets initialized, the organization name and workspace name are needed before the variables.tf file can be read. As a result, Terraform instructs us to add these variables in the backend.hcl file. Please see Terraform Remote backend for more information.
Add the below contents to the backend.hcl file. Please substitute with the values specific to your Terraform Cloud account
Next, create a variables.tf file and add the below contents. Substitute the default value of the "s3-bucket" property with the S3 bucket you wish to use. Feel free to customize these values as per your development setup
Update main.tf with the contents as shown below. We have replaced most of the hard-coded values and extracted them to the backend.hcl and variables.tf files. Line# 2 instructs Terraform to run the deployment in the Cloud workspace we created earlier
The main.tf, variables.tf and backend.hcl files should all be in the root folder as shown below:

We can now upload this configuration to Terraform Cloud and execute the first run in the cloud. Execute the below command to login to Terraform Cloud
terraform login
Next run the below commands
terraform init -backend-config=backend.hcl
terraform fmt
terraform apply
The last command, terraform apply, may take a while to execute since we are running it remotely.
If all goes well, you should see the below status in your Terraform Cloud workspace:

You can also verify that the HelloWorld lambda function was created in AWS account
Run the below command to clean-up the resources created in AWS
terraform destroy
Finally we have to update terraform.yml with the contents as shown below. See line# 101 where we used the TF_API_TOKEN GitHub Secret for triggering remote Terraform deployments
We are now ready to commit the files to GitHub and test our CI/CD pipeline. But before we do that, please verify that the files contain safe code and we are not embedding any AWS credentials in the code. Open up GitHub Desktop, check the files that have changed and ensure that the code is safe to commit.
After verification, please go ahead and commit the files.
CI/CD in action!
Navigate to the Actions tab in your GitHub Repository and check the status of the CI/CD pipeline. As soon as files are updated or added in GitHub, GitHub Actions should launch our CI/CD pipeline. If all goes well, you should see a successful deployment as shown below

You should now also be able to see the deployed lambda function from the AWS management console
Congratulations! You now have a successful CI/CD pipeline for AWS Lambda functions built using GitHub Actions and Terraform.
Clean-up
Run terraform destroy in your local workstation to clean-up AWS resources created as part of this series. This is an optional step if you are doing this as purely as a personal project and would like to save on unnecessary AWS costs.
GitHub Action Badges!
Lets tell the world that we have a successful CI/CD pipeline by adding badges to our Readme.md file. The badge will communicate the status of pipeline, in real time , each time code gets checked-in to the GitHub repo
Click on the "Create Status Badge" to generate the markdown code and add it to Readme.md
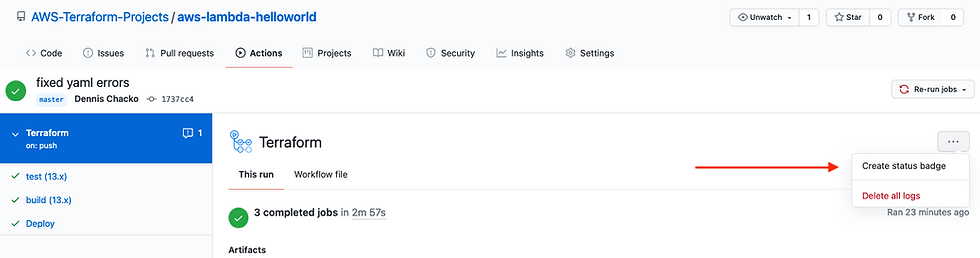
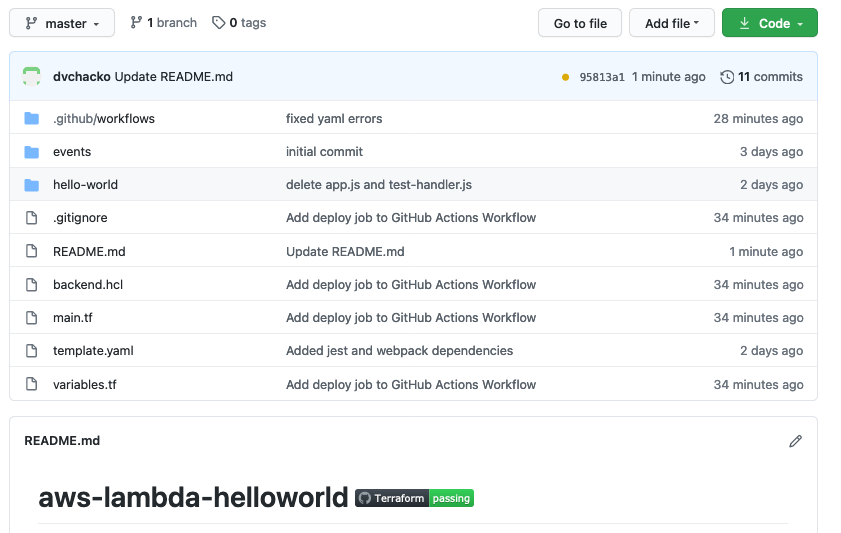
As shown below, we now have a badge indicating the status of our CI/CD pipeline
And that's all folks!. We are all done. I hope you enjoyed this article series as much as I did writing it.
There are lot of functionality in GitHub Actions that you can play around with. For example, line #48 in terraform.yml , I have commented out a conditional statement. The conditional allows the build process to execute only if a PR to the master branch was opened and approved. This is something you might want to consider so that builds are approved before being pushed to a master or feature branch
If you wish to learn more about GitHub Actions and Terraform, please see the reference section below

Comments