Part 2 - AWS Lambda Development Environment with CI/CD
- Dennis Chacko

- Nov 27, 2020
- 3 min read
Updated: Nov 29, 2020
Overview
In Part 1 of this article, we explored creating a local lambda environment and adding Typescript support to the function. We then built and ran the Typescript compatible lambda function using the sam invoke local command. In this article, we'll be setting up Jest as our unit testing framework. We'll also be configuring Webpack to build an optimized artifact which can then be deployed to the AWS Cloud platform
The test cases we create in this article will be used later on as part of our CI/CD pipeline. A successful testsuite will result in the CI/CD pipeline deploying the lambda function to the AWS cloud.
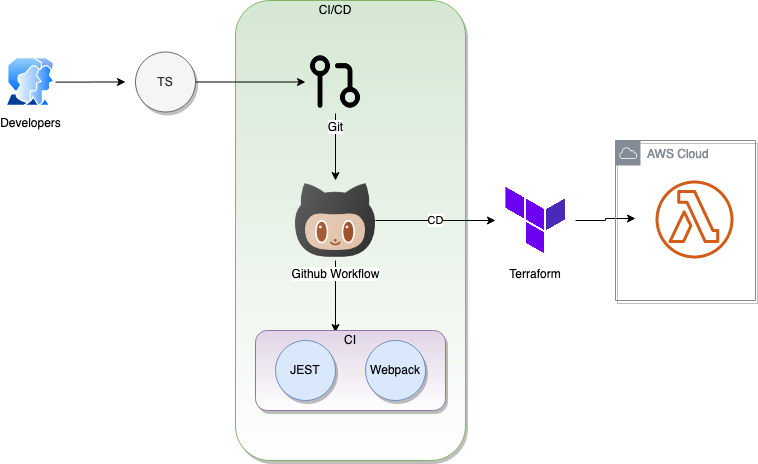
The CI/CD workflow we are building is shown below. We'll be exploring the CI or Continuous Integration portion of the workflow. Specifically, we'll look at creating and running unit test cases using the Jest framework. We'll then use Webpack to build an optimized version of our lambda code
As always, all code is available at GitHub
Add Jest dependency to the lambda project
Lets begin by adding Jest dependency to our lambda project. Navigate back to the hello-world folder containing the package.json file and execute the below commands:
Having now installed Jest and its Typescript add-on, we now have to configure Jest by creating a jest.config.js file. This file will contain instructions for Jest to find and execute our testcases. Please see the below jest.config.js file for reference:
Lets write our first Jest unit-test case. Navigate to the hello-world/tests folder and create a app.spec.ts file. Add the below contents to the file for our hello-word test-case
Our folder structure should now look as below. Please note the location of the jest.config.js and app.spec.ts files. node_modules folder has been omitted for readability reasons

We can now add a test script to package.json and execute test cases from the command line. Please use the below package.json as a reference. See line# 13
We can now execute our test cases on the command line. Navigate to the hello-world folder and execute the below command: npm run test. A successful run should result in the output as shown below:
We have successfully executed our Jest test-suite which forms a critical part of a good CI/CD pipeline. We'll now proceed to the second part of build process. We will use Webpack to bundle our code and make it an artifact that can be deployed to the AWS Cloud
Add Webpack dependency to the lambda project
Navigate back to the hello-world folder containing the package.json file and execute the below commands:
After having installed Webpack and its dependencies, we now have to configure Webpack to build our typescript code and package it as a compressed zip file. This compressed file will then be used to deploy our code to the AWS cloud platform
In the hello-world folder, create a webpack.config.js file. This file will contain instructions for Webpack to find all our code and bundle them into a zip file. Please see the below webpack.config.js file for reference:
At this point, our folders and files should look like the screenshot shown below. node_modules folder has been omitted for readability reasons

We can now add two build scripts to package.json.
build-local. This is a developer-friendly build script suitable for debugging purposes
build-optimized. This is an optimized version of the script that minimizes the code and reduces the size of the build artifact. The output of this script will be a compressed zip file in the dist folder
Please use the below package.json as a reference. See line# 14 and line#15
We can now run our build by navigating to the hello-world folder and executing the below command: npm run build-local. A successful run should result in the output as shown below. Check lines#11 and lines#12 for the files that webpack creates in the dist folder
We can use the sam local invoke command to verify that the Webpack created the files correctly. Navigate to the hello-world folder in the command-line.
Run sam local invoke --template ../template.yaml --event ../events/event.json in the command line. A status code of 200 as shown in line# 10 below indicates that Webpack built our files correctly.
This test can be repeated by running npm run build-optimized and sam local invoke --template ../template.yaml --event ../events/event.json in the command-line. A status code of 200 indicates that Webpack built the artifacts correctly
We now have our project configured to run unit test cases using Jest. We also have Webpack building optimized build artifacts. We are now ready to move on to the Continuous Integration (CI) part of the pipeline. We'll cover CI in Part 3 of this CI/CD article series
Please add your code to GitHub in preparation of the CI pipeline. You can reference this article on adding your code to GitHub.Alternatively you can also folk my GitHub Repo to get an head start. We'll be using GitHub Actions workflow to setup the CI/CD pipeline.

Comments