Part 3 - AWS Lambda Development Environment with CI/CD
- Dennis Chacko

- Nov 28, 2020
- 4 min read
Updated: Nov 29, 2020
Overview
As part of our four part series on setting up an AWS Lambda Development environment, we
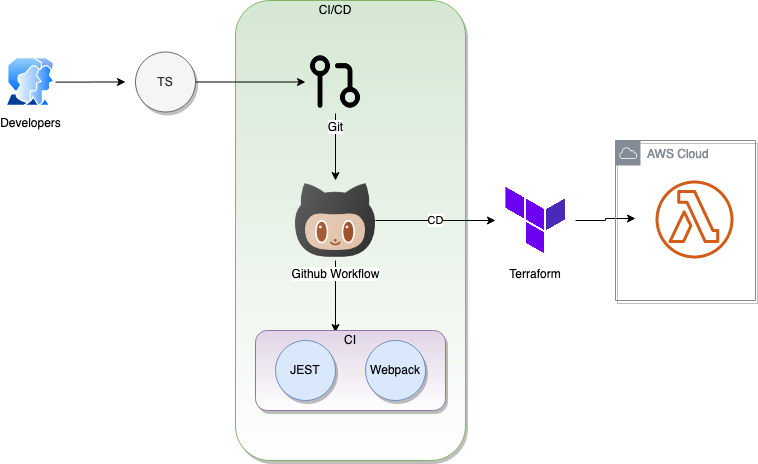
We'll now use GitHub Actions workflow to create a Continuous Integration pipeline. The workflow we'll implement is shown below.
As always, all code is available at GitHub
At the end Part 2 article of this series, there's some instructions on how to add this project to GitHub. Having done that, we can now enable GitHub Actions workflow on the git repository.
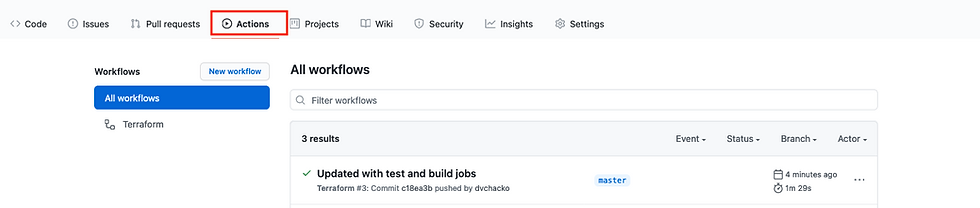
Navigate to your GitHub repository and Click on the Actions tab. Choose the Terraform workflow as shown below and click on the Set up this workflow button

GitHub will now create a sample terraform.yml file. Click on the Start Commit button and commit directly to the main (or master) branch.

Having successfully committed this file to GitHub, lets check it out to our local workstation and start modifying it to suit our CI/CD requirements.
Open out the command line environment and execute git pull in the aws-lambda-folder containing the template.yaml file. This assumes that you are familiar with git commands and have checked out the main/master branch on your local workstation
git pull will download the terraform.yml file from GitHub and place it in the .github/workflows folder
Open up the terraform.yml file and replace its contents with the contents shown below:
We have added a single job named test. This job executes our unit test cases. It specifies the operating system the tests will run on and the node.js version to use. It also sets up a cache to store the node_modules so that the build job does not have to re-install all the dependencies..Finally it specifies the script to run for running the test cases. This script is the same script we build in Part 2 of this series
Please note that the cache does not work when testing this workflow locally. Also check line#6 where the branch name is specified. Change this to 'main' if that is your default branch in GitHub
Test the workflow locally
To test the workflow in your local workstation, install nektos/act . Once installed run the
"act -j test" command in the root folder containing the template.yml file. In my case, this folder is the aws-lambda-helloworld folder. Running the "act -j test" command should execute the test job from the terraform.yml file
The output should display a success status as shown in line#44 below
Create the build job
Having successfully run the test job in the workflow, we can now add the build job to the workflow.This job, as the name suggests, should build our application using Webpack. We can specify the "needs" property to specify that the build job has a dependency on a successful run of the preceding test job. If the test job fails, the workflow should stop and send an email to the developer.
We should also instruct the job to use the node_module cached in the previous job. Finally, in the run section we can specify the script to run for building the application.This script should be the same script we built in Part 2 of this series
On the successful execution of the build script, we want the job to push the app.js.zip file from the dist folder to an S3 bucket. While deploying to AWS Cloud, the deployment job will use Terraform to download the app.js.zip file and deploy to AWS. We go into details of the deployment job in the next article in this series
Edit the terraform.yml file and replace its contents with the contents shown below containing both the test and build jobs.
Test the updated workflow
Execute the act command in the command prompt.
This will invoke both the test and build jobs since the build job will only execute on a successful run of the test job. The final output should look similar to the output shown below:
Check S3 bucket in the AWS management console and verify that zip file containing the lambda code has been uploaded as shown below

Adding Secrets to GitHub
We have tested out workflow locally and it looks good. We now have to run this workflow on the GitHub servers and so the terraform.yml file needs to be committed and pushed to the remote repository. However, we have the AWS credentials hard-coded in the terraform.yml file and this is not a good security practice.
GitHub offers GitHub Secrets to securely store our credentials. Once we created our secrets, we can then reference the just GitHub Secret key ids in the terraform.yml file. This is a more secure practice for storing sensitive information in public repositories
Please see GitHub Secrets for information on how to setup secrets.
We'll need to have the below two secrets created:
AWS_ACCESS_KEY_ID
AWS_SECRET_ACCESS_KEY
Once the above two secrets are created, we can then reference them to our terraform.yml file. Edit the terraform.yml file and replace its contents with the code shown below. See lines 75 and 76 where we reference our GitHub secrets. These secrets are not shared when someone forks your repository
The above file is the optimized version of the terraform.yml file. We removed the step that installs the AWS CLI since GitHub Actions workflows come per-installed with AWS binaries. The cache should also work correctly and the workflow should now run much faster
We are now ready to commit our changes and push them to GitHub. The push to GitHub will trigger the workflow to execute. Run the below git command to commit and push code to the remote GitHub repository.
Before you do this though, please verify that the files you add to GitHub do not contain your AWS Keys. GitHub Desktop is a good UI tool that you could use to check your files before you commit them to GitHub
git add .
git commit
git push
Open the browser to your GitHub repository and check the Actions tab. You should now see your workflow running. A completed workflow should look as shown below:
Click on the workflow to see details of each job.

As you can see, the whole workflow runs in around 2 minutes. We have now successfully built and run the CI portion of our CI/CD pipeline. In Part 4 in this series, we'll work on the Continuous Deployment (CD) to deploy our code to AWS Cloud.

Comments